This was a fun, easy cookie recipe. And I can console myself that despite the sugar and butter, it has a good deal of protein from the peanut butter. Right?
Peanut Butter Pretzel Cookies
8 tablespoons (1 stick) unsalted butter, softened
3/4 cup peanut butter -- we used the grind-it-yourself peanut butter from Whole Foods.
1 cup light brown sugar -- we substituted vegan sugar with no problem.
1 large egg
1/2 teaspoon pure vanilla extract
1-1/2 cups whole wheat flour
1 teaspoon baking soda
1 cup of bashed up pretzels
Preheat oven to 375 degrees. Line a baking sheet with parchment.
Cream together butter, peanut butter, and sugar until well combined. Add egg and vanilla. Mix until well combined. In separate bowl, sift together flour and baking soda. Stir to mix. Slowly add flour mixture to peanut butter mixture, stirring until smooth and well blended. (Note: Do not overmix.) Add pretzels (and any other add-in's you want).
Form golf-ball size balls and place evenly on the prepared cookie sheet -- about 3 inches apart. Chill the dough for approximately 10 minutes ( you could definitely skip this step if it's winter or if you live somewhere cooler than Texas!) Using back of fork press flat.(Note: Each cookie should be 1/4-inch to 1/2-inch thick.)
Bake for 12 to 15 minutes (10 to 12 minutes for soft, chewy cookies) or until golden brown. Cool for 5 to 10 minutes on baking sheets. Remove to baking rack. Cool completely.
Optional add-in's: Semisweet or bittersweet chocolate chips or chunks. Chopped peanuts. Toffee bits.
I spent a fun hour or so in Edom, Texas this morning. I love these tiny towns that seem to be bursting with artists. One is the man who makes these AMAZING birdhouses/fairy houses. You can see other examples here... http://www.arborcastlebirdhouses.com/id3.html I hate myself for saying this, but there are days I'd like to be able to make something like this so much I'd be willing to trade my writing for it. Of course, then I shake myself and remind myself to be thankful for what I have and thankful that there are such amazing artists out there making things simply because they are beautiful.
I love that. Art just to make art.
That is what I keep telling myself today. I will make art for art's sake.
Okay, this was one of those -- WOW! Let's do that even though we could just pop down to the grocery store and buy them for like a dollar. It's way fun and not terribly hard to do.... and just think now we don't have to wait all year for these!
1 (12 ounce) bag milk chocolate chips -- we used semi-sweet. You could also use tinted white chocolate. That would be sort of awesome.
To make actual hollow eggs with the filling inside, you'll need to acquire some egg molds. Alternatively, you can form the filling and dip it in the chocolate. We did the dipping method. It just seemed easier... although probably less 'pretty'.
Another idea would be to put these on sticks like lollipops, but I'm thinking that might just ruin the sticky fingered awesomeness...
It's just too beautiful here to stay inside all of the time, so we've taken some of our projects outside. Of course the beginning of the week was horrible: tornadoes, thunderstorms, flooding, trees falling on houses. But now it's beautiful. And the upside of the rain has been that our veggie garden is going nuts!
This year we are growing: peas, purple green beans (do you still call them green beans?), honeydew melon, cantaloupe, cherry tomatoes, jalapenos, bell peppers, cucumbers, zucchini, and well blah blah blah. The really interesting part is the scarecrow we pulled together out of an old, rusty trashcan, plastic Easter eggs, a old pot, and some assorted kitchen gadgets. Here he is... isn't he beautiful?
These are possibly the most dangerous Easter eggs ever.
I knew I had officially crossed over into Geekville when I actually had a very strong opinion about whether the Dalek or the Cybermen would win in a battle.
Me: "Well, of course it would be the Dalek. I mean, they defeated the Time Lords."
In case you haven't discovered the wonder and awesomeness of Doctor Who, you MUST. Old episodes are available on amazon and you can get all of the discs from Netflix.
I heart Downton Abbey. Sigh. I just spent the weekend
watching a marathon session of Season 2 with my sister and my oldest niece. It
was AWESOME. I do have to agree, however, that it wasn’t as good as Season 1.
It seems like that always happens. A show rocks its first season, then
somewhere it loses its way. There were, of course, amazingly funny moments. And
moments that I swear I was close to tears. But there were also a number of
storylines that just seemed to plod along and then disappear, leaving me
wondering why they were there to begin with.
Anyone who knows me well, knows I’m a huge Anglophile. I’ve
passed this obsession along to Harrison as well, who has decided that he is
going to try to bring hats back. He’s been wearing his fedora almost
constantly. Now he wants a chauffer’s hat like Branson.
The plan for me is to re-watch Season 2 without interruption
so that I can savor it. I cannot wait until Season 3. Is that wrong?
The number one question that I get from people when they
find out I am an author is this: “Where do you get your ideas?” I’ve been up
for about four hours today – the first hour doesn’t really count as it was
spent feeding my cat, staring at the coffee maker in an effort to make it brew
faster (this doesn’t work), and reading. However in just three hours I’ve been
able to tuck several things away in my head that may or may not come out in a
book someday.
Things to think about:
Do anything you can that promotes creativity –
for instance brushing your teeth with your non-dominant hand.
What do people who put up Christmas lights for a
living do in the off-season?
Why has no one invented square or triangular crayons?
I mean, come on.
Who decided that blue raspberry was a flavor?
Would one list “Rose Queen” under employment history on her résumé?
Things I saw/heard:
A girl “hock a big loogie” on the ground and her
boyfriend gaze at her lovingly and say, “Nice one, Babe.”
A guy who has chosen to live with a severe lisp
because he wanted to get his tongue pierced.
Two squirrels sitting on my back fence while
unknowingly making a heart shape with their tails.
The words “git her done” repeated over and over
in a non-ironic way.
A recipe for black bean brownies that I may have
to try.
Okay, this is just a short list and possibly not a very
useful one, but when people ask me the other question that hits the top five
with some regularity (how can I become a writer?), I tell them to PAY
ATTENTION. I also tell them to read, read, and then read some more. That and git her done.
As for the brownies... they are actually pretty good. I KNOW! They aren't the best brownies I've ever had, but those come with a side of sugar crash and a serving of guilt. These, while not health food, are pretty yummy.
Black Bean Brownies
Ingredients
1 (15.5 ounce) can black beans, rinsed and drained
3 eggs
One very ripe banana (or 1/2 cup canned pumpkin -- I'll try pumpkin next... might be good.)
1/4 cup cocoa powder
1 pinch salt
1 teaspoon vanilla extract
3/4 cup white sugar (I'm sure you could substitute agave or another sweetener, but results may vary.
1 teaspoon instant coffee (optional)
1/2 cup milk chocolate chips (optional)
Directions
Preheat oven to 350 degrees F. Lightly grease an 8x8 square baking dish.
Combine the black beans, eggs, banana, cocoa powder, salt, vanilla, sugar, and instant coffee in a blender (or food processor). Blend until smooth.
Pour mixture into prepared dish. Top with nuts or chocolate chips (or both or neither).
Bake in the preheated oven until the edges are just pulling away from the sides. (About 30 minutes). Don't over bake!
I know it sounds bizarre, but then think of all the things we eat now and don't even think about it. Artichokes? Fiddle Ferns? Buddha's Hand? (Okay, this weekend my friend, Kathy, and I were told that this last one really is a novelty and that we'd probably be better off using Meyer Lemons. ) But anyway...I'll post my recipe, but you must see this video. If you love it like I do, take a look at their other videos at tiger in a jar
So, here is my version of Beet Cake:
Chocolate Beet Cake
Adapted from David Lebovitz's website
I'm always looking for new ways to use familiar ingredients. Harrison is fairly used to this by now. But even he looked at me sideways when I told him I wanted to make beet cake.
8 ozbeets, unpeeled, rinsed and scrubbed free of dirt (You can use canned beets (infinitely more simple, but if you haven't roasted beets yourself, you might try it.)
7 oz bittersweet or semisweet chocolate, chopped 1/4 cup hot espresso (or water) -- even very strong regular coffee would be good here 7 oz butter, at room temperature, cubed 1 cup all-purpose flour 3 T unsweetened cocoa powder (the darkest you can find, natural or Dutch-process) 1 1/4 tsp baking powder 5 large eggs, separated, at room temperature pinch of salt 1 cup superfine sugar -- no need to buy superfine sugar. Just whirl your granulated sugar in a food processor or blender for a few moments.
1. Butter an 8- or 8 1/2 inch springform pan and line the bottom with parchment paper. If you don't have this, use a lightly greased and parchment lined 8 inch cake pan (round or square).
2. Boil the beets in salted water with the lid askew until they’re very tender when you stick a knife in them about 45 minutes. Drain then rinse the beets with cold water. When cool enough to handle, slip off the peels, cut the beets into chunks, and grind them in a food processor until you get a coarse, yet cohesive, puree. (If you don’t have a food processor, use a cheese grater.) If you are using canned beets, skip all of the cooking and just puree them.
3. Preheat the oven to 350ºF.
In a large bowl set over a pan of barely simmering water, melt the chocolate, stirring as little as possible. You can also do this in the microwave, but be very careful that you don't scorch your chocolate.
4. Add the butter to the warm chocolate and let them melt together.
5. Sift together the flour, cocoa powder, and baking powder in a separate bowl.
6. Remove the bowl of chocolate from the heat and stir until the butter is melted. Let sit for a few minutes to cool, then stir the egg yolks together and briskly stir them into the melted chocolate mixture. Fold in the beets.
7. In a stand mixer, or by hand, whip the egg whites until stiff. Gradually fold the sugar into the whipped egg whites with a spatula, then fold them into the melted chocolate mixture, being careful not to overmix.
8. Fold in the flour and cocoa powder.
9. Scrape the batter into the prepared cake pan and reduce the heat of the oven to 325ºF, and bake the cake for , or until the sides are just set but the center is still is just a bit wobbly. Do not overbake.
Let cake cool completely, then remove it from the pan.
This was a crazy weekend. My sister, her oldest, her youngest, Harrison, and I all visited my mother this weekend. It was a blast, but at some point I think I lost my mind because during dinner preparation on Saturday, there were six people in my mother's 10 x 10 kitchen. I was making two versions of gingerbread (Yes, two.) My mom was actually cooking dinner. My sister was cutting up fruit for a salad with one hand and holding her daughter with the other. And the boys decide they want to "make something -- something weird." Sigh. We land on kitchen sink cookies --probably not my most inspired moment, but we had limited time (no Harrison, we aren't going to make Danish pastry), limited resources (Yes, the chocolate chip cricket recipe looks interesting, Ryan, but we don't have any crickets), and limited space (the two of you get this much -- 2 feet -- of counter. Keep the mess here .)
So, here's the basic recipe. Below are some of the wonderful add-in's the boys decided to use.
Ingredients:
1 stick of softened butter (salted is fine, but then leave out the additional salt)
1/2 c brown sugar -- I like dark brown, but go with what you like
1/4 c granulated sugar
1 egg
1/2 tsp vanilla -- yes, pure vanilla.
3/4 cup all-purpose flour
1/4 c plus 2T whole wheat flour
1/2 tsp baking soda
1/4 tsp salt
Method:
Cream the butter and sugars together until light and fluffy. Add the egg and the vanilla and mix until incorporated completely.
In a separate bowl combine the flours, soda, and salt and stir until combined.
Gently fold the dries into the butter/sugar mixture. Stir until barely combined. Don't over mix -- they'll be chewy and awful.
Gently mix in as many or as few add-in's as you want.
Mound evenly spaced on a lined baking sheet. And bake at 350 for 12-14 minutes.
Other ideas: broken candy bars, dried fruit, nuts, pretzels, crackers. You can get really wild and add in some herbs... pecans with rosemary sounds yummy to me. Citrus zest, gummy candy, caramels, sea salt, black pepper, coffee grounds, oatmeal...
YAY! Love? Maybe is finally out. I am so, so happy. This was definitely a long haul with lots of different editors and drafts. But, this time around I really learned attention to detail and how to be patient (two lessons I pretty much hate.) I think it came out really great though. Here it is:
From the cover of Love? Maybe:
Just because Piper's birthday is on Valentine's
Day does not mean she's a romantic. In fact, after watching her father and then
her stepfather leave, she's pretty sure she doesn't believe in love at all.
Then her friends concoct a plan to find them all Valentine's dates, and somehow
Piper finds herself with the most popular guy in school. But true love never
follows a plan, and a string of heartfelt gifts from a secret admirer has Piper
wondering if she might be with the wrong guy.
In this heartwarming romance, true love is more
than a maybe - and it might be closer than you think.
Every year I have this urge to go back through all of the photos I've taken over the months. There are a few that stand out. Here's one from Halloween. It makes me smile. One ninja and one? Ummm. Well, I just pulled some things out of my garden and added a couple of fake bumble bees and butterflies.
This week we made something new --roasted vegetable cake. I know it sounds gross, but it was AWESOME. We messed with it a lot from the original recipe, adding more carrots and taking out the sweet potato. I know... I just don't like sweet potato. I know I should because it's so good for you, but I just don't.
So here it is. We're going to focus on Valentine's over the next few weeks both because of my new novel and because I do like any chance to give out (and receive!) candy.
8 oz cream cheese (we used low fat, but you could use fat free (eww) or regular.
Pinch of freshly grated nutmeg
1 teaspoon salt and 1/2 teaspoon pepper to taste
4 Tolive oil for drizzling over the vegetables
2 grams butter to saute the spinach
3 large waxy potatoes, peeled and sliced (this is where the sweet potato comes in if you want to substitute one or more for the regular potatoes.)
1 red pepper, roasted, skin removed (or do what I did -- I just bought a jar of roasted red peppers.)
1 onion diced
3 large carrots diced
6-8 oz baby spinach leaves
Method:
Place the eggs, ricotta, cream cheese, nutmeg, salt and pepper in a food processor and mix until smooth -- With a minimum of help, H was able to do everything with the food processor -- easy and it was fun for him.) If you don't have a food processor, all of this can be done by hand. It just takes more time.
Pre-heat the oven to 350F. Peel and slice the potatoes (and sweet potato if you are using one.) Drizzle with some olive oil, season with salt and pepper and bake for 25 minutes, or until the vegetables are soft enough that you can pierce through them with a fork.
If you are roasting the peppers yourself, char each pepper over an open flame using a pair of tongs. When the peppers have blackened, place them in a large bowl and cover with clingwrap for a few minutes. Carefully peel the skin off the peppers. Otherwise, you can use store bought peppers as well.
Heat a pan with some olive oil and saute the carrots and onions until soft.
Heat a pan with some butter and lightly saute the spinach. Remove from heat and set aside. (You can just use the same pan as above. No need to clean it. Just dump the onions and carrots out.)
In a large round cake pan (I used a nine-inch spring form pan.), layer the potato slices, the sweet potato, red peppers, cubed pumpkin, and then pour over the egg mixture. Finally, add the sauteed spinach. Allow the mixture to settle for around ten minutes.
Bake the frittata for around 40 minutes or until a toothpick comes out clean when you insert this through the center of the cake.
Remove from the oven and slice and eat it.
Options: I think when we make it again (and we will -- it was YUM!) I'll add some browned and chopped veggie bacon -- of course you could use regular bacon -- we're veggie in my household. I also think adding some green vegetables like roasted asparagus or broccoli.
It’s so embarrassing. I’ve probably made fifty batches of
nut brittles over the years, but this weekend I tried to make peanut brittle –
and I failed miserably. It was yummy, but the texture was gross. The nuts were
actually chewy. Not good. So, I’m determined to redeem myself. This is the
recipe I usually use. I tried a different one this weekend, so maybe that was
the problem?
You can change this up endless ways, using different nuts or
seeds. I’m a huge fan of pecan brittle, but if you’ve never made it before, try
peanut first. It’s more forgiving. Pecans go from deliciously toasted to
open-the-window-to-clear-the-room-of-smoke black so quickly. If you want to get
really fancy, you could add herbs or spices to the mixture. Just be careful of
the quantities here. Remember while cooking is an art, baking (and candy making)
are also a science. I’m thinking pinenuts and rosemary? That might be awesome.
Here is the recipe I’ve used a million times. Use this one.
It rocks. It’s from – who else?—Martha Stewart.
Ingredients
·Nonstick cooking spray
·1 1/2 cups sugar
·1/2 cup light corn
syrup
·3/4 teaspoon salt
·2 tablespoons butter
·1 1/2 cups mixed nuts,
such as pecan halves, cashews, pistachios, coarsely chopped if large
·1 teaspoon vanilla
extract
·1/4 teaspoon baking
soda
Directions
Spray a rimmed baking
sheet and a wide metal spatula with cooking spray; set aside.
In a 2-quart glass
measuring cup, combine sugar, corn syrup, and salt, stirring until sugar is
moistened. Microwave on high for 4 minutes. Stir in butter and nuts; return to
microwave for about 5 minutes, until the sugar mixture is thick, bubbly, and
very pale brown in color. Mixture is very hot; use handle when holding and
pouring. (Alternatively… and this is the way I do it… place everything in a pot
and on the stove.) I’ve found I can monitor things better and avoid scorching
the sugar and burning everything.)
Remove from microwave,
stir in vanilla and baking soda (mixture may foam up). Immediately pour onto
prepared baking sheet, spreading mixture as thinly as possible with the
prepared spatula. Let stand 20 minutes until hardened, then lift off sheet, and
break brittle into bite-size pieces.
I've been on a roll with Christmas treats this year. Peppermint Bark is always on the menu at our house in December. I mean, seriously. It's the easiest thing to make in the whole world. Never, ever buy it. We actually saw it in a tiny box at the store today for $5.99. You can get a box of candy canes for 99 cents and a bag of chocolate chips for less than two dollars. And I'm guessing you can make at least twice (if not three times) as much as there was in the box.
Ingredients:
Candy canes (or peppermint candies). I've actually seen this with other hard candies, like butterscotch and Lifesavers, but I'm sort of a traditional gal.
A bag of chocolate chips. I go with Ghirardelli 60% Cacao Bittersweet, but Harrison loves milk chocolate. And while I'm not a fan of white chocolate, that is also an option.
This is also your chance to be creative. Basically anything that will stick in melted chocolate (and seriously, what doesn't?), you can add. Some suggestions: nuts, cookies, candies, cereal, marshmallows, crystallized ginger, crystallized citrus peel, chilies, dried fruit, pretzels, caramels, chips. I'm thinking....pretzels and toasted pecans in dark chocolate. Or what about dried cherries and chilies in bittersweet? Or crystallized ginger and almonds in milk. Sigh. So much bark, so little time.
Method:
Start by melting the chocolate. This is best done over very low heat in a heavy pot, but you can use the microwave. Just be sure to monitor it carefully. It'll scorch if you walk away.
Unwrap the candies and put them all in a heavy ziploc bag. I let Harrison do this part. He loves it. Then just start bashing them with a rolling pin or even a hammer. I usually have him do this on a towel to protect the counter.
Spread the melted chocolate on a parchment lined baking sheet. You can use Silpat, but it gets messy.
Sprinkle with the crunched up peppermint candy. Then using a metal spatula, press the candy into the melted chocolate.
Let cool.
Then break it up into pieces and eat.
Options to consider: Different chocolates or even a marbling of a couple of chocolates would be yummy. You might also try to add nuts or dried fruit. I've seen white chocolate, almond and dried cranberry bark. Another good one might include crystallized ginger or dried chili peppers. You can really use whatever would stick to the chocolate -- sprinkles or sugar decorations might be fun. And seriously -- M&M's or chocolate covered nuts or chunks of other candy bars or cookies or pretzels or chips. Yum.
Every once in a while we manage to make something that is even better than the inspiration. I think this is one of those times. We needed to make some cookies for the school Christmas party. And we wanted them to be awesome, so of course we turned to Pintrest for inspiration. So cute and so easy! I'll give you both the uber-easy way and the "I have a little more time today" way.
The Easy Way
Ingredients:
This makes fifteen good sized cookies.
One package of cookie mix (the original recipe called for peanut butter, but one of the kids in Harrison's class is allergic to nuts, so we used sugar cookie dough which I tinted with about 1/4 c of baking cocoa. (You will also need the ingredients for the cookie dough -- for the sugar cookie dough, you'll need one stick of butter and an egg. For the peanut butter, you'll need 3T of vegetable oil and an egg.)
Hershey's Chocolate drops.
Milk chocolate Flips -- or other chocolate covered pretzels.
Edible sugar googly eyes. (If you can't find these... use M&M's like the original version, but I think the googly eyes make these really special.)
Method:
Mix the dough together, then shape into fifteen balls. For the reindeer shape, make the balls slightly narrower on one end, forming a cone. Chill in the freezer for about five minutes.
Bake in a 350 degree oven for approximately 12 minutes.
Remove the cookies from the oven. Working quickly, press the pretzels, the drops, and the eyes into the cookies.
Let them cool slightly, then transfer them carefully to a wire rack. Be careful. The chocolate is very soft at this point. But it will firm up once the cookies cool.
The "I Have More Time Way"
Ingredients:
3/4 cup peanut butter
1 1/4 cup firmly packed brown sugar
1/2 cup shortening
3 tablespoons milk
1 tablespoon vanilla
1 egg
1 3/4 cup all-purpose flour
3/4 teaspoon baking soda
3/4 teaspoon salt
Chocolate-covered mini pretzels
Edible googly eyes or M&M's
Hershey's chocolate drops
Method:
Preheat oven to 375°F.
Combine brown sugar, peanut
butter, shortening, milk, and vanilla in large bowl. Beat at medium speed until
well blended. Add egg; beat until just blended.
In a separate bowl, combine flour,
baking soda, and salt. Add to creamed mixture at low speed. Mix just until
blended.
Form dough into 1-inch balls. To
make reindeer-shaped cookies, pinch the bottom of the ball slightly to form a
point, then gently flatten with your hand. Space cookies about 2 inches apart on
a greased cookie sheet and bake for 7 to 8 minutes, until set or just beginning
to brown.
Remove from oven and immediately
(and gently) press two mini pretzels into the tops of the cookies for the
reindeer's antlers. Press two googly eyes or M&M's into the reindeer for the eyes. Then press one chocolate drop for the nose.
Allow to cool 2 minutes on the
baking sheet and then transfer to a wire rack or paper towel to cool
completely.
I always have such high hopes for the holidays. I imagine
days of baking and making cute gift bags with homemade treats. The reality is a
little less, well, Martha-ish. However, I do firmly believe in making time for
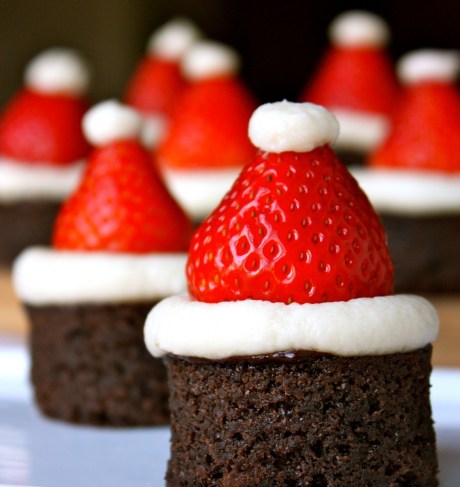
a few fun (and new projects)….. hence the Santa Hat Brownies.
·1
pan of your favorite brownies, cooled and cut into desired size and shape (I
used a round cutter) – or for the really rushed baker – those two-bite brownies
they sell in the bakery department of every grocery store. (Shhh. I won’t
tell.)
·12-16
small strawberries, cleaned and hulled – Try to find smallish ones. The usual
ones are enormous and way too big for this project.
·Vanilla
frosting. Either use the recipe below or just buy a can of white frosting. I
mean, seriously. These are so cute, no one will notice.
To assemble, pipe a ring of vanilla
buttercream on top of each brownie. Cut off the base of a strawberry so
it is flat and place it upside down on each brownie, pushing slightly to secure
in place. Top the tip of the strawberry with a dot of buttercream to
finish the Santa hat.
Mascarpone
Buttercream
Ingredients:
1/2 cup (1 stick) unsalted butter, room temperature
8 ounces mascarpone cheese, room temperature
2-1/2 to 3 cups powdered sugar
2 teaspoons vanilla extract
pinch of salt
Method:
Using a stand mixer with a paddle attachment, beat butter and mascarpone cheese
until light and creamy, about 2 minutes. Add vanilla extract and salt.
Add 2-1/2 cups of sugar, half a cup at a time and continue beating until
smooth. Add more sugar, if needed to reach desired consistency and
sweetness.
This cake refrigerates and freezes well, and is best served reheated for a few seconds in the microwave oven.
1 1/2 cups water
1 1/2 teaspoons baking soda
1/2 cup butter
1 cup sugar
1 cup dark molasses
2 tablespoons finely minced fresh ginger
zest of 1 lemon
3 1/2 cups all-purpose flour
2 teaspoons cinnamon
1 1/2 teaspoon baking powder
1/2 teaspoon ground cloves
1/4 teaspoon salt
3 eggs
Preheat oven to 350°. Butter or oil a 9" x 13" cake pan. Line the bottom with parchment paper for easier removal.
Bring water and baking soda to a boil. Take off heat and set aside.
In a separate bowl, combine minced ginger, lemon zest, flour, cinnamon, baking powder, ground cloves, and salt. Set aside.
Cream butter and sugar together until light and fluffy. Add molasses and continue creaming until light in color.
Add flour mixture and water and soda mixture, alternately, in three parts. Mix well between additions.
Add eggs, one at a time, mixing well between additions. Scrape bowl and mix well for 2 minutes.
Pour batter into greased, lined cake pan. Batter should come up to the halfway point in the pan. Spread evenly. Bake at 350° for 45-60 minutes or until toothpick inserted in the middle comes out clean.
Cool for 30 minutes in the pan. Slice into squares and serve warm with lightly sweetened, fresh whipped cream. Who are we kidding? Just gobble it up. (My sister likes her's with some chocolate bits melted on top. I favor a schmear of Nutella.)
Okay, I will admit that I am sort of a chocolate freak. In fact, when people say -- "Nah, I not really a fan of chocolate", it makes me a little nervous. I believe that they are A) mentally unsettled, B) in denial, or C) have been force fed Chips Ahoy and Oreos and therefore cannot be held responsible for their opinions.
But, tonight I have to admit something. While generally I'm all about good, real desserts, there are sometimes those moments when I just want something gooey and sweet and well, now. This is where these come in. And please don't sneer at them until you've tried them.
Chocolate Smoothies
1/2 c butter (the original recipe calls for 1/4 cup butter and 1/4 cup shortening -- but the butter is better)
1/2 c dark brown sugar
1/2 cup flour
pinch of salt
1/2 t vanilla
1 cup of chocolate chips
1 cup of chopped nuts (toasted) (optional)
1 cup of broken pretzels (optional)
Mix this all together until crumbly then press it into the bottom of a glass dish. A pie pan is fine (glass only) or a 9x9 cake pan (also glass).
Microwave at 50% power for approximately 4 minutes. This will vary, so keep an eye on it. You want it all to be soft, but be careful of scorching. It can get nasty quickly.
Remove from microwave and sprinkle 1 cup of semi-sweet chocolate chips on top. (I suppose you could use any chips -- white chocolate, milk chocolate, even peanut butter chips.)
Let this melt then spread it all over the top like you are icing a cake.
Top with 1/2 crushed nuts (I like toasted pecans, but any nuts will do.) You can leave these off -- my sister does, but I do think they make it better.
It’s odd how things line up this way. We found this VERY
cool experiment online and had to do it. It’s from Steve Spangler Science,
which is seriously the coolest site ever for kitchen projects. http://www.stevespanglerscience.com/
We decided to do the Density Tower, which is less sinister than it sounds. I’ll
go through all the steps, but you can also just watch the video on Steve Spangler's site.
What You Need:
·A tall, thin glass cylinder. This can be a
flower vase, a graduated cylinder, or simply a tall glass.
·A turkey baster
·Honey
·Karo syrup
·Maple syrup
·Dawn dish soap (important as this is a known
density)
·Water –
colored with food coloring
·Vegetable oil
·Rubbing alcohol – colored with food coloring.
·Lamp oil
·(An optional addition is milk, which we didn’t
use. We thought it might get gross.)
What
You Do:
You
must add the substances in order. First, the honey, then the Karo syrup, then
the maple syrup. Pour slowly and try to keep the substances from touching the
sides of the cylinder. Then, using the turkey baster begin adding the other
ingredients in this order: dish soap, water, vegetable oil, rubbing alcohol,
then lamp oil. For these ingredients, it’s best to also go slowly and let the
substances slide down the inside of the cylinder. Then you’re done!
Magic Cookie
Bars (or Seven Layer Bars)
Bring on the
Magic Cookie Bars. Okay, to be truthful, the only magical thing about them is
that they are so easy. Well, I guess they are also pretty darn good.
Ingredients:
1 1/2 cups graham cracker crumbs
1/2 cup butter, melted
1 (14 oz.) can Eagle Brand® Sweetened Condensed Milk
2 cups (12 oz. pkg.) semi-sweet chocolate chips
1 1/3 cups flaked coconut
1 cup chopped nuts
(You will notice that there are only six layers here. The optional layer can be
1 cup of peanut butter chips or a drizzle of caramel topping. We went with just
six ingredients.
Our modifications: We (I mean Harrison)
aren’t big coconut fans, so we omitted the coconut in favor of toffee bits. (1
cup). Then we increased the nuts to 1 ½ cups. We used pecans, toasted (duh).
Directions:
HEAT
oven to 350°F. Spray 13 x 9-inch baking pan with no-stick cooking spray.
COMBINE
graham cracker crumbs and butter in small bowl. Press into bottom of prepared
pan. Pour sweetened condensed milk evenly over crumb mixture. Layer evenly with
chocolate chips, coconut and nuts. Press down firmly with fork.
BAKE
25 to 30 minutes or until lightly browned. Loosen from sides of pan while still
warm; cool on wire rack. Cut into bars or diamonds.
For
perfectly cut cookie bars, line entire pan with foil, extending foil over edge
of pan. Coat lightly with no-stick cooking spray. After bars have baked and
cooled, lift up with edges of foil to remove from pan. Cut into individual
bars.(Sigh…. That’s the Eagle Brand
method. We just pretty much scooped out what we wanted into a dish and ate
it..)
Keep in mind that these are
sweet! I mean, make your teeth ache sweet. And, I’m no baby, but whoa.
More often than not the image of what we’re going to make
doesn’t match up with what we actually make. This week was a prime example of
this. My son’s teacher sent an email asking if we could send treats for Pumpkin
Day. Well, sure. So, after much discussion we decided to make alien cupcakes
and fruit kabobs because nothing says Pumpkin Say like a bunch of fruit on a
stick and a weird aliens made out of fluorescent green frosting and Twizzlers.
And the image I had of all of this, of course, came from
Martha Stewart. (That was your first problem, you say.) So, we go to the store
and buy a chocolate cake mix – no, Martha didn’t recommend this – obviously.
And we buy a can of vanilla frosting (also not very M.S.). We searched for the
green taffy that she used, but all we found were bags of multicolored taffy.
And I’m thinking to make 24 cupcakes, we’ll need to buy about eleven bags, so
we kept looking. Luckily Twizzlers now has rainbow colored licorice (which I’m
not entirely sure can actually be called licorice. (Seriously.) I already had
some giant gumdrops at home (courtesy of Whole Foods – try the Acai berry ones.
Yum).
So, here’s what we did:
1.Mix cake mix according to the package
directions. I’m sorry. I know. But, there it is.
2.Pour the mix evenly into a lined cupcake pan. We
filled them about ¾ full. I like a puffy cupcake.
3.Bake according to the directions. Gotta love Duncan
Hines.
4.While the cupcakes baked, we mixed up some acid
green frosting, sliced the gumdrops in half and sliced the Twizzlers into
thirds.
5.Cool the cupcakes. Frost. Decorate. Done. (Take
that M.S.)
The fruit kabobs are also way easy. I would have to say I
probably wouldn’t do these for the under six crowd. Halloween just isn’t going
to be as much fun if someone gets a skewer in the eye. Buy fruit, wash, cut as
appropriate, slide the fruit onto the skewers. We also used marshmallows, but
beware if you want to do this. Add the marshmallows just before you serve them.
They get mushy.
That’s it. Like I said, our photos probably more
realistically reflect a ten-year-old and his crazy mom’s abilities than the
beautiful photos that M.S. turns out. I like to lower the bar. It makes it
easier to step over it.